
Sewing More Panties!
- Oct 11, 2019
- 3 min read

Last week on the blog Julie Stilwell shared with us all the wonderful panties she has been making with the Infant Snowdrift pattern. She is back again today with more panty inspiration and a tutorial on how she modified the panty pattern by creating a casing and eliminating the need for a buttonhole. You can purchase some of Julie's wonderful creations from her etsy shop Lamond Traditional.
Judith’s directions are very comprehensive and include making two buttonholes to allow for the addition of the waist elastic. She offers a small tab that can be added to cover these. I have revised this and make a casing that eliminated the need for the buttonholes and therefore the tab also (unless you like the tab and want to add it for decoration, which you can still do).
Cut out your pantie pieces from your main and lining fabrics. I often use a plain lining fabric if I am using a pattern for the main. You will have two fronts; two backs and two crotch pieces- main and lining pieces.

Cut a strip of fabric 2 ½ times the width of the widest part of the back panel and 2 inches wide. Make a small rolled hem on both long sides. I used a 4mm Bernina #69 foot to make my rolled hems. If you don't have a rolled hem foot, see this tutorial on how to stitch a narrow rolled hem.

Press. Using a long gathering stitch or ruffler, gather the fabric along the centre to make the ruffles. If you don't have a ruffler, again see this tutorial.

Pin the gathered fabric to the right side of the back panel, about 2 ½ inches above the leg area and then stitch in place following the line of gathering threads on the ruffle.


With right sides facing, join the back panel to the front. Press seams open.

Repeat last step for pantie lining. With right sides together, matching back panel seams, pin and then stitch all the way around using a ¼ inch seam.

I trim this seam to 1/8 inch and then press the seam towards the lining. Open out the two pieces and press the seam again.

Fold the lining to the inside, so wrong sides are together.

Top stitch 1/16 inch away from edge. I use an edge stitch foot and move the needle to the left a couple of spaces to do this


Starting at the centre back, stitch again, about ½ inch from edge stitching, secure starting point. End stitching ½ inch before you reach the starting point. Secure the stitching.


You will have created a casing for the waist elastic, with a small opening at the centre back. Using a small safety pin, thread the waist elastic through the casing, going up between the two layers of fabric. Pin the loose end to the inside near the opening to make sure it doesn’t get pulled into the casing!

Pull the safety pin out of the casing along with a short length of elastic. Release the pin from the elastic and secure that end with the other end of the elastic using a zig zag stitch.

Pull the waist of the pantie to get the elastic into the casing.
With right sides together stitch one of the crotch pieces to the lining, back and front with a ¼ inch seam. Press the seams open.

With right sides facing stitch front of the other crotch piece to the front of the pantie.

Then, with right sides together, stitch the back of the crotch piece to the back of the pantie. To make this easier, tuck the rest of the fabric ‘inside’ and then stitch. Then flip right sides out.

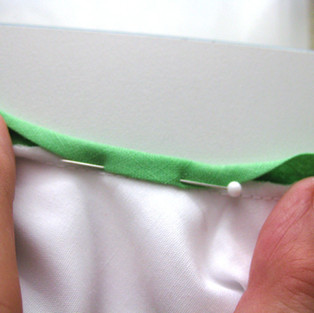
Next add the bias band to the pantie legs. I have a stash of vintage ready-made bias binding that I like to use when ever possible. I either use a colour that matches my main fabric or one that contrasts with it.
I add the bias to with right sides facing and a ¼ inch seam. I start by folding ¼ inch over to neaten the edge. Machine around the leg and then fold over ¼ inch at the end so both folds are touching.


Press towards the binding. Then fold the bias over and hand stitch in place on the wrong side.


Using a safety pin I thread the elastic through the bias casing and secure the ends as before with a zig zag stitch. Then hand close the opening of the casing.
Because on these panties I used a smaller bias binding I used 1/8 inch elastic in the casing. Panties are complete!

I am sure you will find your own way to embellish these panties. I know I have fun planning how each pair will match the dress they are being made for!