
How to Hand Pleat for Smocking
- Jul 19, 2022
- 3 min read
Hand pleating is simply a stitching a series of running stitches across the width of the fabric.
Normally we use a pleater to prepare fabric for smocking, but there are several reasons why you may wish to hand pleat the fabric. In this video tutorial I will demonstrate how to pleat fabric and provide the reasons why you may wish to choose to do so. If you wish to listen rather than read, the video is at the bottom of the post, but I have also written out the steps.
You may wish to hand pleat fabric for smocking because you don't own a pleater and the chosen design is not suitable for a pre-pleated insert, the fabric for the project is not suitable for a pleater, or the area to be pleated requires the greater control provided by hand pleating.
You wish to hand pleat because you don't own a pleater.
If you don't own a pleater and want to give smocking a try, the easiest way to do this is to use a pre-pleated insert. However, that does limit your design choices to patterns that use an insert. If you have your heard set on smocking a traditional square yoke dress with a smocked skirt, you are out of luck. This is exactly the situation that I faced when I found Sewing Classic Clothes for Children on my library shelf. I wanted to make the cover dress for my daughter. I checked out the book and made my first smocked dress by hand pleating the fabric.

The fabric choice for the project isn't appropriate for the pleater.
You may wish to pleat a fabric that will not easily go through a pleater. The fabric may be too thick such a wool coating the will probably break the needles of the pleater, or you may wish to pleat a drapy fabric for an adult garment such as a rayon or georgette. Such fabrics do not have enough body to easily go through the pleater. A silk fabric can easily mark if pleating an area bigger than where the smocking ultimately will be. If pleating a check or a stripe, the stripes or checks may not be the same distance apart as the pleater needles and you may wish to avoid the moiré effect that will result if you put the fabric through a pleater.
You need greater control than the pleater provides or it is easier to just hand pleat.
If you wish to pleat a curved area, greater control is provided by hand pleating. If you wish to just smock a small area at the neckline of the garment, it may be easier and quicker to just hand pleat a few small rows than setting up the pleater.
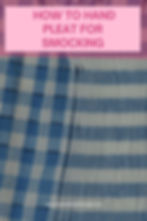
While it may seem tedious, the gathering is done with a simple running stitch. Many smocking designs only require 5 or 6 rows of gathering, and I would bet you that while you are sitting there watching your child's soccer game, swim meet, music lesson, or sitting in the car pool line, you could have the necessary piece hand gathered. If you want try try hand pleating, the easy way is to pick a fabric with the grid built in. Quarter inch gingham is perfect. The grid is required for the running stitches because the stitches need to enter and exit the fabric at the exact same point along the rows to form vertical pleats on grain. The easiest way to "mark" the fabric on the grid is to use a fabric that is already marked such as a 1/4" check.

A regular stripe also works. With a stripe, use a removable fabric marker to draw the lines.

Iron on dots are also available for just a few dollars.

To hand pleat, simply thread the needle (use quilting cotton if you have it as it is stronger) and stitch a running stitch along the row. You can stitch an even running stitch as I did on the gingham above (same amount of thread on both sides of the fabric), or if you are using dots, or the stripe, stitch an uneven running stitch (more thread is on the wrong side of the fabric). The pleats should be 3/8 of an inch or 1 cm apart. 1/4 inch also works.
When stitching an uneven running stitch, work from the wrong side of the fabric, and just take a bite of the fabric picking up the dot, or in my case, the stripe. When you are done, knot off the threads by twos on each side and pull up the pleats to the width specified in your pattern!