
Hand Smock Simplicity 9141
- Jun 7, 2022
- 3 min read

A pattern such as Simplicity 9141 that incorporates the technique of shirring is the perfect place to start to add hand smocking to an adult garment. In this tutorial I will walk you through the adjustments needed to the pattern to hand smock the front of the dress. There is a video tutorial below and the steps are also written out. Before we get started, if aren't familiar with the differences between shirring and smocking, this post will explain them. Let's get started!
Pick a fabric appropriate for Hand Smocking.
Fabrics that would be appropriate for this pattern include 100% cotton lawn, batiste, broadcloth or voile. Imperial Broadcloth and Batiste as well as Handkerchief Linen would also work. While the pattern also recommends georgette, rayon and silky fabrics, those are all difficult to put through the pleater. Make sure to purchase additional fabric since width will be added to the pattern to accommodate the smocking. Unless making the smallest of sizes, the fabric will need to be 55 or 60 inches wide. I demonstrated using a size 12 and needed 48" of width.
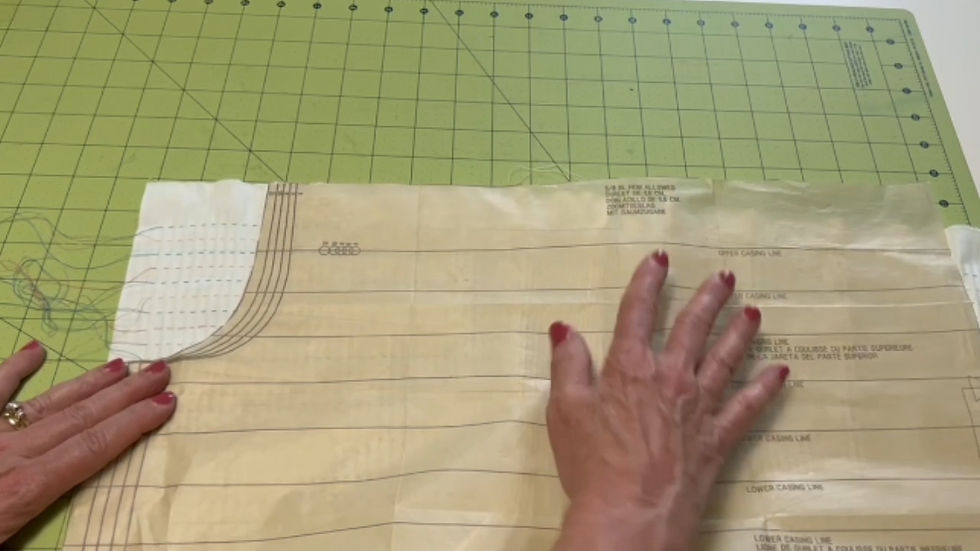
Test the Fabric.
Cut a strip of fabric 4 inches high and the width of the Front Bodice (pattern piece 1). Remember that pattern piece is placed on the fold so cut the strip to be the entire width. My size 12 was 38" wide. Cut a piece of 1/4" elastic the size of the Lower Elastic Guide (pattern piece 3). Mine was 14". Draw a line down the middle of the strip and stitch 1/2" seam binding to the strip as instructed in the shirring directions in the pattern. Feed the elastic through the shirring and measure the width of the resulting strip. Mine gathered up to 15-16" depending on which fabric I used. Take the width of the gathered strip and multiply it by 3. I multiplied 16 by 3 to get 48.

Cut a Rectangle of Fabric for the Front.
Do not cut out the Front Bodice. Instead cut a rectangle of fabric for the Front Bodice that can be pleated. The width of the rectangle is the amount determined in the previous step and the height of the rectangle is the height of the Front Bodice pattern piece.
Determine how many rows to Pleat.
The top pleating row should be placed 1/2" above the top Upper Casing Line and the bottom pleating row should be 1/2" above the top of the lowest Lower Casing Line. Ideally, there would also be a holding row above and below each of those pleating threads. For sizes 4-12, that means pleating 21 rows.

Mark the top Upper Casing Line on the fabric and pleat the rectangle of fabric with the 3rd needle from the top lining up with the Upper Casing Line. Make sure to leave long pleating threads so the Bodice piece can be flattened out.

Cut out the Armholes and Finish the Top.
Draw in the armhole on each side of the bodice. Remove the pleating threads from the armhole and cut out the armhole.
Finish the top of the bodice as directed in the pattern. Remove the pleating threads from the seam allowances and tie off the smocking to the width determined in step one when testing the fabric by shirring.

Smock the Front Bodice with a Smocking Stitch that provides Elasticity.
To make sure the Front Bodice has the needed elasticity, make sure to use an elastic smocking stitch. The Van Dyke Stitch is an advanced smocking stitch but one that is very elastic. Here is a tutorial on how to smock the Van Dyke Stitch. Other recommendations include using a design with wave or trellis stitches. Avoid rows of cable which will restrict the elasticity. I hope you give this technique a try. For other patterns that can easily incorporate smocking, check out this Woman's Top where I added the Van Dyke Stitch and this blog post with alternative pattern recommendations.

If you haven't signed up for the newsletter, make sure to do so and grab your free Daisy Smocking plate!


