
10 Tips for Beautiful Picture Smocking
- Sep 13, 2022
- 6 min read
Updated: Jul 3, 2025

Often when one thinks of smocking, and especially smocking for children, what immediately comes to mind are the adorable designs created with picture smocking. It is so fun to dress your little one in fun designs featuring bunnies, birdies, flowers or even hippos! All of these smocking designs are created using stacked cables, so today's in today's post (and video at the bottom of the post if you prefer to listen) we are going to tackle the Staked Cable stitch.
Picture Smocking is creating a smocked design by stacking the cable stitch one on top of another to create a solid swath of color. The resulting design forms a recognizable object or "picture."
Now stacked cables have the reputation of being difficult, but they really aren't - I promise! They are just the basic cable stitch stacked one on top of another by mirror imaging the row, and the Cable Stitch is simple! You can find a complete tutorial on the Cable Stitch here. A Stacked Cable is simply working the Cable stitch so the Up Cable Stitches "kiss" the other Up Cable Stitches and Down Cable Stitches "kiss" the other Down Cable stitches. Below you can see the green stitches "kissing" the white ones. Done in the same color, they create a solid swath of color.

So why is this often considered difficult? Well, the goal with picture smocking is to create a design composed of a solid thread filled area with no foundation fabric showing through. There just isn't as much leeway for error. It is similar to the difference between sewing a fitted dress and a loose tunic. The tunic is much more forgiving. Likewise a geometric smocking design is more forgiving than a picture smocked design. The key to accomplishing a great picture smocking design is to set yourself up for success by choosing the right materials in the first place. So here are 10 Tips for Success!

1. Choose the Right Base Fabric:
In order to create that solid thread filled area, that base fabric needs to be composed of crisp, full, round, and closely spaced pleats. You can see the nicely packed pleats of Mama and Little Giraffe above. In a geometric design pleats can be closely spaced or further apart and the design will still look lovely. In Picture Smocking, pleats spaced further apart result in design distortion, or base fabric peeping through. To combat this, choose an Imperial Broadcloth, 100% Cotton Broadcloth or a Kona Cotton fabric for you base fabric. My preference is the Kona Cotton because it does a better job of hiding the backsmocking, but it only comes in a 45" width. Cotton Broadcloth comes in 60" width and may be needed if smocking for an older child.
Often Picture Smocked designs are stitched on an insert so even if your garment fabric is something softer or finer, the base fabric for the Stacked Cable design can still have that needed fullness. Personally, I always pleat the entire width of fabric and then cut off any extra that I don't need. Our Pink Hollybush Inserts are 60" white cotton broadcloth and our Ornament strips are 45" Kona Cotton.
2. Use a Needle that Allows the Floss to Lie Flat as it Passes through the Fabric.
I have always smocked with a #7 Darner and most smockers I know also use that needle. Its large eye handles 3 and 4 strands of floss beautifully. Its long shaft helps the stitcher to line up the next stitch horizontally. However, if more than 4 strands of floss are needed, the #7 Darner begins to bunch them together. Try a #5 or #3 Darner or a #18 Chenille and see if the larger eye and resulting larger hole in the fabric, keeps the threads from bunching.
3. Use the Number of Strands of Floss that Provides the Needed Coverage.
Traditional wisdom is to use 3 strands of floss for geometric smocking and 4 strands for Picture Smocking. But there is no reward for using just 4 strands! Remember the goal is a lovely filled area of stitches with no base fabric peeking through. If it takes 5 strands or even 6 to get that look, go for it! There are no smocking police who are going to show up at your door if you use more than 4 strands! Some colors of floss seem to be thicker and provide more coverage than others. White floss is known for being thinner. One caution if using more strands than 4 strands - do make sure the added floss isn't making the design too tall, but that you are able to get the number of rows into the space that the design calls for.
4. Strip and Squeak the Floss.


To achieve a fuller stitch, remember to "Strip and Squeak" your floss. Cut a section of 6 stranded floss. Separate each strand from the others. Put the requisite number of strands back together, and run a damp piece of felt along the strands. My friend Kelli says you will hear a squeak as you run the felt along the floss. Hearing the squeak isn't necessary, but smoothing the floss this way gives greater stitch coverage and fullness.
5. Take a Deeper Bite of Each Stitch when Stitching.
In order to wrap the pleat with floss, the Stacked Cable stitch is often stitched deeper into the pleat. Stitch 2/3 of the way down the pleat toward the valley rather than stitching more on the surface of the pleat. Most Stacked Cable designs require back stitching to hold the pleats in place over the "white space" (areas that do not include a design motif). I prefer to backstitch after I have stitched the Stacked Cables. This enables me to push the pleats back and forth to get that greater depth as I stitch. It is difficult to do this if the back is already stitched. Also, the back stitches can knot the floss if you have to stitch in and out of them. This is my personal preference, but others prefer to backstitch first. Try each way and see what works best for you.
6. Stitch the Design from its Widest Part to the Narrowest.
This may mean starting in the middle of the design and working up and then down, and turning the design upside down to stitch back on the next row. For example, Mama and Baby Giraffe instructs the stitcher to start on the tail row and stitch up to the head and then down to the feet. By working from wide to narrow, you but up against stitches already placed. It is difficult to put a stitch in the correct place that is hanging out there in the air all by itself.
7. Go Back and Fill in Half Stitches.
It is difficult to accurately place half stitches as you go along. Skip half stitches and go back and add them later. It will be simple then to see exactly where they are needed. (A half stitch comes up in the valley, over the pleat, and down in the next valley).
8. Step Back and Look at the Overall Design.
Stop periodically, step back and keep looking at the overall design. Since you are making one stitch at a time, it is easy to focus just on that stitch and not notice if you are maintaining a horizontal line as you stitch, keeping your stitches lined up, and having the necessary number of rows. Use the shaft of your needle to see if the stitches are lining up and to push the floss together to help maintain that line. Remember, the overall goal is a solid filled area of stitches, so if you do have some base fabric peeping through, don't distort a stitch or slant it to solve the problem. Instead, keep your stitches level and go back later to fill in any gaps.
9. Go Back and Fill in the Gaps.
It is perfectly acceptable to thread up the needle with 2 strands of floss and go back and fill in any needed areas. Remember there are no smocking police! In Little Hippo below that my friend Kelli stitched as a teaching sample, you can see the base fabric peeping through. (She did this on purpose.)
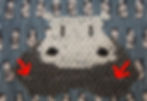
Take 2 strands of the dark gray floss and go back and fill in the gaps.
10. Make a copy of the smocking graph and mark on the graph where you are as you are smocking.
It is so frustrating to loose your place in the design, and so easy to do when you are flipping the design upside down to stitch the next row, so place a mark next to the row that you are stitching.
For more help with picture smocking, check out the Rosie pattern and course from Pink Hollybush. The Rosie dress includes a bargello design which is an intro to Stacked Cables and the course includes a video with additional help on stitching stacked cables.
The goal is a solid swath of color, but most of all remember that your lovely design will be on a moving child who will be thrilled with that hippo or bunny or birdie that you created and never care if a little base fabric is peeking through, so don't be intimidated and give picture smocking a try!